Showing posts with label recipe. Show all posts

Tuesday, June 14, 2011

Daring Cooks Challenge: Slimmed Down Potato Salad

Jami Sorrento was our June Daring Cooks hostess and she chose to challenge us to celebrate the humble spud by making a delicious and healthy potato salad. The Daring Cooks Potato Salad Challenge was sponsored by the nice people at the United States Potato Board, who awarded prizes to the top 3 most creative and healthy potato salads. A medium-size (5.3 ounce) potato has 110 calories, no fat, no cholesterol, no sodium and includes nearly half your daily value of vitamin C and has more potassium than a banana!

After browsing through some of the other freaking amazing recipes people came up with this time around I think my Daring Cooks recipe is rather undaring but it did taste good!

Slimmed Down Broccoli Potato Salad

1 kilo (2.2 lbs) small potatoes, quartered (use red or white or a combination of both)
1 head broccoli, cut into small florets
4 hard boiled eggs
1/2 cup greek yogurt (I used 0% Total)
1/4 cup mayo (if you use yogurt mayo you won't need to add any sweetener as it's rather much sweeter than normal mayo)
1 tbsp apple cider vinegar
2 tsp sugar or sweetener of your choice
1 tsp ground mustard
1/2 tsp horseradish powder
1/2 tsp salt
freshly ground pepper, to taste
1 small red onion, diced
1 small sweet onion, diced
3 celery ribs, chopped
1 large red bell pepper, diced
1 large yellow bell pepper, diced

Place the potatoes in a pan and cover with salted water. Bring to a boil. Reduce heat and simmer for about 12 minutes. Drain and cool for a half an hour or so.

Chop up the hard boiled eggs. You can leave out the yolks if you want to slim the recipe down a little more but I like to add them in.

In a large bowl whisk together the yogurt, mayo, vinegar, sugar, mustard, and salt. Add the potatoes, eggs, and veggies and toss to coat.

Chill in the fridge for about a couple of hours and serve cool.

Thursday, May 19, 2011

Lime Pie Recipe

It was Martijn's turn to cook for his dinner group this week so I offered to make the dessert. We had cilantro-lime rice with dinner and I decided to carry on the lime theme by making lime pie! Plus it gave me an opportunity to use my little whipped cream gun that I decided I REALLY REALLY needed a few weeks ago and have only had the opportunity to use once. You could use key lime juice for this if you want to but since I didn't have urges to search 100 places to find them I just used normal limes for the juice.

Lime Pie

Crust:
125 grams (1 cup plus a little bit extra) graham cracker or digestive biscuit crumbs
85 grams (6 tbsp) butter, melted

Filling:
1 can (395 grams or 14 oz) sweetened condensed milk
3 large egg yolks
1/2 cup freshly squeezed lime juice
2 tsp lime zest

Preheat the oven to 175 C (350 F). Grease a 9 inch (23cm) pie plate. Mix together the cookie crumbs and the butter and press into the pie plate to form the crust. Bake for 15 minutes. Remove and let cool on a wire rack while you make the filling.

Using an electric mixer (or your wildly strong arms and a whisk), beat the egg yolks until they've lightened in color and become creamy (about 3-4 minutes). Slowly drizzle in the sweetened condensed milk and mix until combined. Finally add in the lime juice and lime zest and mix well. Pour the filling into your crust and bake for about 15 minutes. You want the filling to still have a little jiggle if you wiggle the pan but not much.

Let it cool on a wire rack and then poke it in the fridge for a few hours.

Decorate with whipped cream and enjoy!

Tuesday, April 12, 2011

Gluten Free Carrot Pineapple Cake

With my abundance of carrots, I've been experimenting a little bit and trying some new things. I started with Nigella's Venitian Carrot Cake recipe and took some creative liberties with it. It uses almond flour instead of wheat flour so it's a more dense "cake" than what you'd normally think of when you think carrot cake. This also means it's gluten free!

Almond Flour Carrot Cake

For the cake:

1/2 cup olive oil (not extra-virgin)
2 cups grated carrots
1/2 cup golden rasins
1 cup chopped fresh pineapple (I don't know why canned wouldn't work but I used fresh)
1/4 cup pineapple juice
1/2 cup sugar or sweetner of your choice
1 tsp vanilla
3 eggs
2 1/2 cups almond flour
1/2 tsp cinnamon
1/2 tsp ground nutmeg
Zest and juice of 1 lemon

You'll also need a 9" springform pan.

Mix the raisins with the pineapple and pineapple juice and let them soak while you work on other things.

Preheat the oven to 350 F. Line the base of your springform with parchment paper or grease it really well.

Pat the carrots dry with a towel to blot up excess moisture.

Whisk the sugar and olive oil together. Whisk in the vanilla and eggs. Fold in the ground almonds, carrots, raisin pineapple mix, cinnamon, nutmeg, and the lemon zest and juice.

Pour the batter into the springform pan and smooth the top the best you can. It will be rather thin, probably only an inch or so high in the pan.

Bake for 30-40 minutes or until a toothpick in the middle comes out mostly clean. It was done in my oven at about 34 minutes, so just keep your eye on it.

Let cool for about 15 minutes on a rack before you pop the sides off the springform.

For the topping:
250 grams (about 1 cup) Mascarpone
1 tbsp powdered sugar
1 tsp vanilla

Mix together well and spread over the top of the cake.

*****

Be sure to swing by and visit Balancing Beauty and Bedlam for more Tasty Tuesday recipes!

Tuesday, April 05, 2011

Carrot Salad with a Kick

Since the last slaw recipe I made was such a hit at the North American Women's Club meeting, I decided to try out another one this month. The fact that I have a giant box full of carrots also influenced the decision. I really like the sweet chili sauce in this. It gives it an extra spicy kick without it being burn your face off hot!

Carrot Salad with a Kick

Ingredients:

4 carrots, grated or julienned
1 small head (or half of a larger head) of cabbage, shredded
15 grams fresh cilantro, stemmed and chopped
Handful of peanuts, chopped and toasted

Dressing
2 limes, zest of 1 and juice of both
1 inch fresh ginger, grated finely
2 tbsp sweet chili sauce
1 tbsp fish sauce
1 tbsp soy sauce
1-2 tbsp sugar or sweetner (mix everything together first and add until it's sweet enough for your tastes)

Mix together the carrots, cabbage, and cilantro. Whisk together the dressing ingredients and pour over the carrot mix. Sprinkle the peanuts on before serving.

Enjoy!

*****

Be sure to swing by and visit Balancing Beauty and Bedlam for more Tasty Tuesday recipes!

Tuesday, March 01, 2011

Asian-Inspired Slaw

I made this for the NAWC meeting today and I thought there was going to be a fight over who got to lick the bowl (ok, not really but it was pretty popular). I think if you wanted to make a "main course" of it you could toss in some shredded chicken. Someone also suggested shrimp might be good in it (thanks Sarah!).

Asian-Inspired Slaw

Salad:
1/2 small head red cabbage, shredded thinly (about 225 grams or 8 oz)
1/2 head Chinese kool (Napa Cabbage), shredded thinly (about 225 grams or 8 oz)
3 green onions, thinly sliced
1/2 cup chopped peanuts
Big handful cilantro, roughly chopped

Dressing:
3 cloves garlic, minced
1 tsp Tabasco sauce (or other hot sauce)
1/4 cup rice vinegar
1" piece of fresh ginger, grated
2 Tbsp soy sauce
3 Tbsp smooth peanut butter
2 Tbsp olive oil
1 Tbsp sesame oil
1-3 tsp sweetener of your choice (add 1 tsp at a time and taste it until it makes your tongue happy)

Whisk the dressing ingredients together (or blitz them with your immersion blender).

Mix together the cabbage, green onions, cilantro and peanuts.

Drizzle the dressing over the cabbage and toss to coat. Be sure to serve it quickly or it can get soggy and gross. If you need to transport it somewhere, keep the dressing apart and just toss it in when you're ready to serve it.

This is supposed to make about 4 servings but you might just want to eat it all by yourself.
*****

Be sure to swing by and visit Balancing Beauty and Bedlam for more Tasty Tuesday recipes!

Wednesday, January 26, 2011

How to Make Potstickers

I don't usually do step-by-step photo recipe posts because they're time consuming and tricky. And lets be honest here- I'm just plain lazy. This is just one of those things that works better with a little visual help.

I buy my won ton wrappers from one of the oriental stores here. They are usually in the frozen section, and cost anywhere between 1-1.50€ (200g package). They do have round "pot sticker" wrappers, but I haven't found those here and the square ones work just fine. You can make your own, but unless you've got a pasta machine that can roll things really thin, I don't recommend it. It's a -lot- of work. I bought the pork from the local butcher. Ground beef will work too, but I like the taste of pork better in these. I've used half and half (which is readily available in the regular supermarkets here), but again, I prefer all pork.

You will need:
250 grams (approx 1/2 lb) ground pork
1/2 onion
2 garlic cloves
1" fresh ginger
2 tbsp soy sauce
1 tbsp sesame oil
25ish won ton wrappers

Potsticker HowTo 1


Gather up your ingredients. Laugh at the funny picture on the bag from the butcher.

Mince the garlic, grate the ginger, and mince the onions. If you have a food processor or chopper, I highly recommend using it since you want things to be quite small. Mix the pork, garlic, ginger, onions, sesame oil and soy sauce together. It's best if you let it sit for an hour or so before you continue, but if you're really hungry you can just go ahead ;)

Fill a small dish with some water. You're going to use this to moisten the outer edges of the won ton wrapper so that it'll seal properly. Pull out one of the wrappers and put about a tablespoon of the filling in. You don't want to overfill them because they might come unsealed when you're boiling them later. Wet your finger and run it around the outside edge of the wrapper. Fold it in half so that it becomes a triangle, and pinch the edges closed. Make sure it's sealed well.

Potsticker HowTo 2


Put the assembled pot sticker on a plate and cover with a towel. Continue the process until you've used all of your meat mixture. This recipe will make about 25, give or take a few.

Fill a good sized pot with water and bring to a boil. Drop the pot stickers in the water 5 or 6 at a time. I wait until they float to the top and then cook another minute or two. Remove the pot stickers from the boiling water with a slotted spoon (let the water drip off) and continue the process until all of them are cooked.

Potsticker HowTo 3


If you've sealed your pot stickers properly, they'll come out of the pan looking like this:
potsticker16


If you didn't seal them properly, they'll come out of the pan looking like this:
potsticker17

See? They're a little floppy and waterlogged. They'll taste still taste okay, but if you choose to fry them they're a little more fiddly to deal with and tend to fall apart.

Finally, if you choose, you can fry them in some vegetable or sesame oil until the outsides are just slightly browned. I usually skip this step because they are really good without it, but if you like crunchy pot stickers then go ahead.

potsticker18


There are lots and lots of recipes online for dipping sauces, but I think if you put the right ingredients inside them you don't need the extra sauce.

If you want to get really creative, you can try these different methods of folding the wrappers.
*****

This week P is for potstickers! Make sure to go check out the other fantastic participants by clicking on the picture below!

Jenny Matlock

Tuesday, January 04, 2011

Cranberry and Cream Cheese Muffins

Santa gave me the January 2011 BBC Good Food magazine and these Cranberry & Cream Cheese Muffins were one of the first things that caught my eye! I made the first batch as the recipe was written and whipped up a second batch with a few changes. I think you could probably do these entirely in whole wheat flour, but I just did slightly less than half (since it's a more dense flour).

Cranberry & Cream Cheese Muffins

Cranberry & Cream Cheese Muffins
Adapted from BBC Good Food

100 g cream cheese
200 g sugar
175 g cranberries
100 g flour
90 g whole wheat flour
2 tsp baking powder
Pinch of salt
3 eggs (the eggs I've been getting are rather small, so you might just want to use two if you have large or XL eggs)
75 ml sunflower oil
1 tsp vanilla extract

Line a 12-hole muffin tin with muffin papers.

Beat the cream cheese with 25 grams of the sugar and set aside.

Heat the cranberries with 25 grams of sugar until they start to pop and break down a bit (around 5 minutes). Mash them lightly with the spoon and set aside to cool.

Sift the flours into a bowl and add remaining 150 grams sugar, baking powder, and salt.

Add eggs, oil, vanilla, and mashed cranberries to the dry ingredients and stir together. It will be a really thick and gloopy.

Divide the batter between the 12 muffin papers, but leave a little bit to cover up the cream cheese at the end (about a tbsp per muffin).

Make a small well in the center and drop in a blob of the cheese mixture. Drop a little bit of of the reserved batter on top of the cream cheese.

Bake at 175 C for 25-30 minutes. Cool on a wire rack.


*****

Be sure to swing by and visit Balancing Beauty and Bedlam for more Tasty Tuesday recipes!

Tuesday, November 09, 2010

Split Pea Soup

Picture 3154

There is no doubt in my mind that fall is in the air! With the colder weather I think it's nice to sit down to a bowl full of a nice hearty soup. Pea soup is pretty popular here but I haven't had any that quite tasted like "home" so I had my grandma send me the recipe. This is one of those recipes that's even better as leftovers.

If you're here in The Netherlands looking for a hambone, ask the slager (butcher) for a hamschijf.

Split Pea Soup


SPLIT PEA SOUP
(use this basic recipe for Lentils and Whole Dry Peas too)

For 10 hungry appetites, you will need:

1 pound (2 1/3 cups) green or yellow split peas or lentils, washed
8 cups cold water
meaty ham bone
3/4 cup chopped onion
3/4 cup diced celery
3/4 cup diced raw carrots
1 large bayleaf
1 teaspoon salt
1 fat garlic clove, if desired

Combine in heavy kettle with a tight-fitting lid. Bring water to boiling point. Cover. Reduce heat. Simmer for 2 hours, stirring occasionally. Split peas and lentils require no soaking. Dry whole peas should be soaked. Sometime try 2/3 green and 1/3 yellow split peas.

Remove ham bone. Take off meat; cut in pieces and add to soup, not sieved but stirred well. These are very thick soups which need a bit of thinning. But use them "condensed" if to be frozen. There will be about 8 cups of the thick soup. Thinned to the desired consistency, count on 10 to 12 servings of a bit more than acup each. To thin: for Split Pea Soup, stir into the slowly-heated soup a small amount of hot water, light cream or undiluted evaporated milk. For Lentil Soup, chicken broth, tomato juice, diluted cream of tomato soup or water may be used. Lift out the bay leaf before freezing or serving.

To serve: pour into heated tureen, heated soup plates or over-sized coffee cups. Garnish-toppings may be bits of the ham cut from the ham bone, sliced Vienna sausage or thin slices of frank-furters which have been cooked gently in butter, snippets of cooked bacon, crisp hot croutons. With Lentil Soup, alongside the tureen have bowls of snipped parsley mixed with minced raw sweet onion to stir into the individual serving, slivers of salami, buttered croutons of rye bread, thick dairy-sour cream for toppings. And a bottle of sherry wine for those who may wish to add a bit to the serving, a good flavor addition for both soups. A tray of Take-Your-Choice-of-Toppings is fun. For a Supper Buffet, and a fruit salad bowl, a crusty loaf of French bread. Good coffee of course!

*****

Check out more yummy Tasty Tuesday recipes at Balancing Beauty and Bedlam.

Wednesday, August 25, 2010

Bacon & Egg Casserole with Tomatoes

We have received approximately 9 billion fresh eggs from Martijn's parents in the recent weeks (a good thing) but I hadn't been feeling particularly inspired on how to use them (a bad thing). I hadn't made a quiche or egg bake for awhile, so this is what I came up with. It goes together really fast and really works as an "anytime of the day" meal. Martijn, who is not a usual tomato lover, said "I really like the tomatoes in this!" I'd call that a success story.

Tomato & Bacon Egg Bake

1/2 cup grated cheddar cheese
150 grams (5-6 oz) bacon, cooked up and crumbled
150 grams (5-6 oz) grape tomatoes, sliced (cherry tomatoes will work, just make sure to get some sweet ones!)
1 medium onion, diced
1 bell pepper, diced
6 eggs
1/2 cup evaporated milk (koffiemelk for you Netherlandians)
1 tbsp prepared mustard
Glug of olive oil
Pinch of thyme or preferred herbs
Salt & pepper to taste

Preheat the oven to 350 F (175 C).

Saute the onion and pepper in a little bit of oil until onions are translucent.

Pour a glug of olive oil into the bottom of a baking dish (my baking dish is about 6" X 9"). Tip the dish so that the oil spreads around the bottom of the dish.

Sprinkle the cheese and bacon over the bottom of the baking dish. Arrange the slices of tomatoes over the top of the bacon and cheese. Then spoon the onions and peppers over the top of the tomatoes.

Beat the eggs, milk, mustard, thyme, salt and pepper together. Pour the mixture over the goodies in the baking dish.

Bake uncovered for 40-45 minutes, or until a knife in the middle comes out clean. Let sit for 5 minutes and serve with a nice piece of toast.

Wednesday, June 30, 2010

Corn Tortilla Egg Bake

I've been on a REAL corn tortilla binge while I've been in Utah and this is one of the yummy recipes I've used them in. It's had rave reviews from everyone I've fed it to so far!

Corn Tortilla & Sausage Quiche

1/2 lb sausage
6 corn tortillas
1/2 cup shredded "Mexican Blend" cheese
1/2 cup shredded cheddar
1 small can (1/4 cup) chopped green chilies
6 eggs, lightly beaten
1/2 cup milk
1/2 cup cottage cheese
1/2 tsp chili powder
1/2 cup fresh cilantro

In a large skillet, brown the sausage.

Place 5 tortillas into a 9" pie plate, overlapping and extending a bit past the rim. Place the last tortilla in the middle. Put the sausage over the tortillas and sprinkle with half of the cheeses and the can of chilies.

In a large bowl, combine the eggs, milk, cottage cheese and chili powder. Slowly pour over the chilies and meat.

Bake at 350 F for 45 minutes. The center will be puffed and lightly brown.

Sprinkle with cilantro and serve with sour cream and salsa.

***
Check out more yummy Tasty Tuesday recipes at Balancing Beauty and Bedlam.

Thursday, June 17, 2010

Vanilla Extract

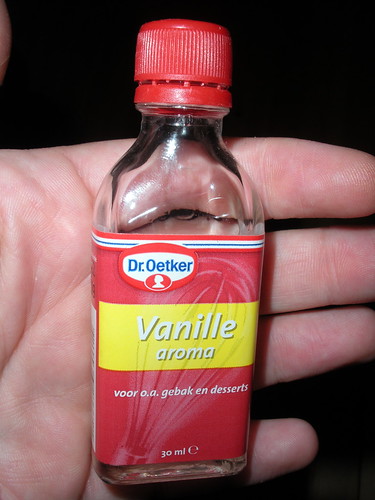
The first time I went to get vanilla from the supermarket, I had a hard time finding it because I was looking for a little brown bottle. I did not find a little brown bottle. I didn't even find a little clear bottle with brown vanilla-ey colored liquid. I found this:

DSCN0926

It was CLEAR IMPOSTER VANILLA! Now, to be honest, I'm not so much of a snob that I won't use imitation vanilla. The problem was, the imposter vanilla wasn't even trying to be vanilla-like in any way! Clear wannabe vanilla... pfft!

I decided to take matters into my own hands and manufacture my very own REAL vanilla extract.

I purchased the "extract grade" (B grade) Bourbon vanilla beans from The Organic Vanilla Bean Company's eBay store. They ship worldwide and seemed to have the most reasonable prices (including their shipping prices) of any other bean sellers I could find. They ALSO were the only company that actually had the B grade beans in stock when I was looking for them.

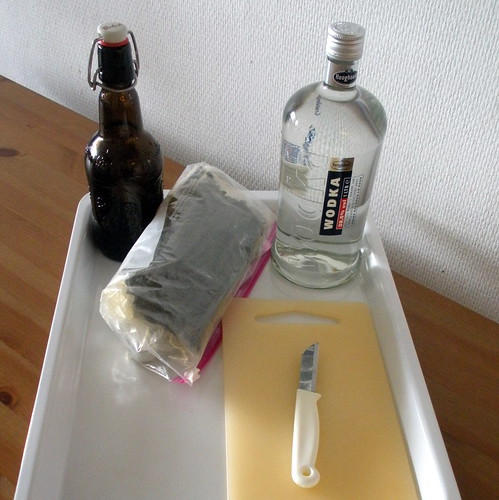
Next, you're going to need to make a trip to the liquor store and pick up a bottle of cheap vodka (geez, I feel like such a lush saying that, and I don't even drink!). I went and pretended I knew what I was doing and just grabbed the first bottle that I saw with a sale tag. It was a very technical method *ahem*.

You'll also want to aquire some dark colored glass bottles to brew your vanilla in. I got ahold of some Grolsh beer bottles because they had the nifty swingtop cork thingies and were easy to open but sealed tight when they were closed.

Other than that, you'll need a sharp knife, a funnel, and a free couple of hours.

*** How to Make Vanilla Extract ***

Gather up your supplies. You'll need the following:

Vanilla How-to 1

Vanilla Beans (8 beans per cup of vodka)
Vodka
Dark colored bottle with a tight fitting cap
A sharp knife and cutting board
Funnel

vanillatut1
vanillatut2

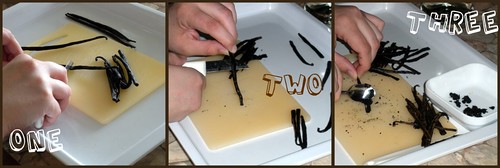
Step One: Cut your vanilla beans in half. Unless you have a heck of a lot of vodka and a really tall skinny bottle, they're not going to be entirely submurged if you don't! You'll cutthem in half again in step four, but it's easier to scrape out the bean guts on the slightly longer pieces.

Step Two: Cut the beans in half legnthwise. I find that if you start on the cut end that it's easier than trying to get the knife through the (sometimes) tougher end.

Step Three: Scoop out the beans innards. From what I understand, this step helps make a stronger vanilla. You can skip it, but your vanilla won't be as potent.

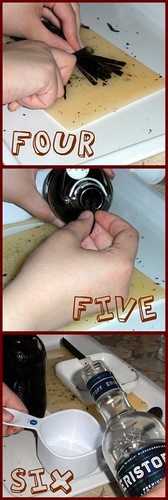
Step Four: Cut the beans in half once more. You can skip this step, but if the pieces are shorter, you can be sure that the entire thing is covered with the alcohol.

Step Five: Load up the bottle with your pieces of vanilla bean and the bean guts that you scooped out in step three.

Step Six: Add the vodka to the bottle. Make sure to use a funnel, trust me on this one! Cap the bottles.

Next, you need to shake them up. Dance around the house if you wish, I won't tell! Shake the vanilla everyday for the first week and then once or twice a week thereafter. You'll have a weak extract after about 6 weeks, but the longer you leave it to "brew" the better! The previous batch I made sat for about 6 months and it's really very good.

vanilla9
Shake, shake, shake!

After your vanilla has been brewing for as long as you can stand to brew it (I recommend 6 months), you can strain it through a piece of fine cheesecloth and put it into smaller bottles. This is another step you can skip out on, but if you're giving it as a gift (which I think you SHOULD because it's awesome) then I recommend doing it.

Please please let me know if you have any questions! Sometimes when I'm writing instructions I read over it about seventy-thousand times and STILL miss when something comes across as a little bit unclear.

Enjoy!


*****
Since I've not had a lot of time at the computer, I'm reposting this as my "v" for Mrs Matlock's AlphabeThursday! It was originally posted on June 7, 2009.


Jenny Matlock

Thursday, June 03, 2010

Tantalizing Truffles

I could pretend that I spent months seeking out the finest ingredients for these truffles and that I then spent days lovingly preparing them. But... that would be a fib and I usually try to stick with the truth! These truffles are made from three ingredients and don't take more than an hour or so to make!

Oreo "Truffles"

450 grams (16 oz) Oreo cookies
225 grams (8 oz) softened cream cheese
Enough chocolate for dipping- you can use almond bark or the candy melts but I just used regular chocolate bars that I chopped up and melted.

Pulse the cookies in the food processor until they're fine crumbs. If you don't have a food processor, just smash the heck out of them in a plastic bag with a rolling pin. Transfer the crumbs to a big bowl and add the cream cheese. Mix until well blended. Roll the cookie mixture into 1" (2.5cm) balls. Place in the freezer for about a half an hour. This will make them easier to dip.

Melt the chocolate. Using a toothpick (or skewer) poked into the top of the balls, dip them into the chocolate until coated. Set on waxed paper to cool. Drizzle more chocolate over the top if desired and store in the fridge.


Now, I can't get mint oreos here, but I think they would be fantastic for this project. Alternatively, you could use mint extract. I think this "recipe" has a lot of possibilities limited only by your imagination and the kind of sandwich cookies you use!

*****

I'm participating in Mrs. Matlock's Alphabe-Thursday! Click the link below to see what sort of other terrific and things people have posted about.


Jenny Matlock

Wednesday, May 12, 2010

Tuna Salad

I sorta went off on my own this week in regards to the Food Network Chefs Cooking Challenge. I took the Tuna Everything Bagel recipe from Tyler Florence and made it my own! Sorta... well, not really but I did change a few things.

Tuna Salad

First, you might notice that the bagel is missing. Actually you might be noticing the whole "sandwich" aspect of the thing is missing. I wish I had a cool story about ninjas stealing my camera so I couldn't photograph the actual sandwich, but we were hungry and ate them before I even thought of taking a picture! The lovely tomato guarded tuna salad photo above is from my dinner night when Martijn was out with friends. It's the same salad, minus the sandwich part. Anyhow, I've seen bagels here before but not been compelled to buy them. I used these whole wheat "bake at home" breads that I like for sandwiches like this. Secondly, I did not artfully sling red onion rings over the top of my tuna salad tower like the photo on the Food Network site shows. I hacked them up into little bits and added them into the salad. For the sandwiches I didn't bother with the tomato and cucumber and we had a side salad instead. Lastly, I used dried herbs since I had everything I needed and didn't have to buy anything this way.

Onward to the recipe!

Tuna Everything Bagel
Courtesy Tyler Florence

Ingredients
Tuna Salad:

3 cups good quality canned tuna (packed in water), drained (This seemed like a lot. I used two of the normal sized tuna cans and I don't think it was anywhere near 3 cups)
1/4 cup mayonnaise
4 cornichons, chopped (These are just little pickles. Don't be fooled by the fancy French word!)
2 tablespoons chopped fresh dill (2 tsp dried)
1 tablespoon chopped fresh tarragon leaves (1 tsp dried)
2 tablespoons freshly chopped parsley leaves (2 tsp dried)
2 tablespoons capers, drained (I chopped these up too since the flavor is okay but the texture freaks me out if I bite into a whole one)
1 lemon, juiced
Kosher salt and freshly ground black pepper
1/4 to 1/2 cup extra-virgin olive oil, or to taste
2 everything bagels, sliced and toasted
1/4 cup cream cheese
1/2 red onion, thinly sliced crescents (chopped small enough to add to the salad)
1 vine-ripened tomato, sliced (skipped on the sandwiches)
1 seedless cucumber, sliced (skipped on the sandwiches)
4 Bibb lettuce leaves

Directions

Begin with the tuna salad. Combine ingredients in a large mixing bowl and stir to combine. I recommend mixing everything EXCEPT the olive oil and then add it last so you can get the right amount of moisture from it. It's hard to tell if you need more or less if you add it before things are mixed up. Taste and adjust seasoning with salt and pepper.

Take cut bagels (or whatever) and toast under a hot broiler until golden brown. While still hot smear the bottom with the cream cheese immediately. Top with a scoop of the tuna salad and then layer with red onion, tomato, cucumber and lettuce. Or, if you're me, scoop on a glob of salad and leave the snooty artful onion slinging for the experts. Add the top half of the bagel and serve.

The Verdict: This was good! In fact, I've already made it twice this week. I like that it has a little less mayo and the cream cheese between the bread and the salad is genius!

Wednesday, May 05, 2010

Apple Cider Chicken

Sunny Anderson seems to have a LOT of good looking uncomplicated recipes that normal humans would eat! Sometimes of the recipes I've found for other chefs had me wondering who their target audience actually was, but I think Sunny's target audience is ME! I made Apple Cider Chicken

Apple Cider Chicken

Apple Cider Chicken
Courtesy Sunny Anderson

Ingredients
2 tablespoons olive oil
2 tablespoons butter (skipped this since I didn't think it needed both oil and butter)
4 boneless, skinless chicken breasts (about 2 pounds) (I made two breasts but didn't halve the sauce ingredients)
Salt and freshly ground black pepper
1/2 Vidalia onion, chopped (for the Netherlandians- Albert Heijn has zoete uien or you can find them at most markets)
1 Granny Smith apple, cored and sliced into 1/4-inch wedges (peeled mine and added an extra apple)
3 cloves garlic, minced
2 teaspoons dried thyme
2 bay leaves
2 tablespoons all-purpose flour
1 1/2 cups apple cider (I used some unfiltered apple juice since I think it's basically the same thing... can anyone confirm or deny this? "Cider" here is alcoholic).

Directions

Heat oil and 1 tablespoon butter in a skillet over medium-high heat. Season the chicken breasts with salt and pepper, add to pan and sear until golden, about 4 minutes each side. Remove chicken from pan, and set aside. Add remaining butter and onion, apple, garlic, thyme and bay leaves. Saute until apple begins to get color and onions soften, about 6 minutes. Add flour and stir 2 to 3 minutes. Nestle chicken back into pan, add cider, bring to a boil, reduce to a simmer and cover. Cook until chicken is cooked through, about 12 minutes.

The Verdict: YUM! I'm not always in the mood for fruity sweet with my meat, but this really hit the spot. I think it would be a wonderful sauce to put on pork chops too!

Wednesday, April 28, 2010

Chicken Teriyaki with Ginger Rice

I had a bit of a tricky time choosing a Sandra Lee for this weeks Food Network Chefs Cooking Challenge recipe because she uses so many pre-made ingredients. I have nothing against using pre-made stuff but it can be hard to track down here! I had some drumsticks in the freezer so I decided to make the Chicken Teriyaki with Ginger Rice.

002

Chicken Teriyaki with Ginger Rice
Courtesy Sandra Lee

Ingredients
  • 1/2 cup reduced sodium soy sauce
  • 1/4 cup brown sugar (2 tbsp brown sugar Splenda)
  • 1 tablespoon chopped garlic
  • 1 (1-inch) piece peeled, fresh ginger, divided use, 1/2 grated the other half thinly sliced
  • 2 pounds skin-on boneless chicken thighs (I did drumsticks)
  • 1 tablespoon canola oil (skipped this)
  • 2 cups conventional white rice (I don't eat much white rice so we did brown instead)
  • 1 teaspoon salt
  • 3 1/2 cups water
  • 1 bunch scallions, ends removed
Directions

In a large plastic resealable bag, add the soy sauce, brown sugar, garlic, and grated ginger and mix until the sugar is dissolved. Put the chicken thighs into the bag with the marinade. Seal and refrigerate at least 2 hours or as long as overnight.

Preheat a grill or grill pan over medium heat. (I cooked these in the Turbo but followed the grilling instructions)

Remove the chicken from the marinade and set aside. Put the marinade in a pot over medium heat and reduce by half. Oil the grill grates with canola oil, arrange the chicken on the grill, skin-side down and cook for 8 minutes per side. Brush the chicken liberally with the reduced marinade before turning.

In a medium pot combine the rice, sliced ginger, salt and 3 1/2 cups of water. Bring to a boil over medium heat, then reduce the heat to low and cover. Let cook until the rice has absorbed all the water and is fluffy, about 15 to 20 minutes.

While the chicken is cooking, put the scallions on the grill. Cook until wilted, about 2 minutes per side. I forgot to do this, oops!

Transfer the rice to a serving platter, discarding the sliced ginger. Top with the cooked chicken, garnish with grilled scallions and serve.

The Verdict: The chicken was good. I think that I still prefer my other chicken recipes over this one, but it did have less ingredients and went together pretty fast. The rice was just boring so I won't keep that recipe around.

Wednesday, April 21, 2010

Chicken & Chorizo Sandwiches with Fried Peppers

This week will be my thirty-first Food Network Chefs Cooking Challenge post! I had no idea we'd been doing this quite so long already. I've managed to make & post something from every single chef so far (minus one... I made the recipe and didn't post it, oops!). This week brings us to Robin Miller. She has a lot of great looking recipes and I love that they're so fast to make!! Lately I haven't been feeling like spending quite so much time cooking so these quick recipes I'm finding just make me feel HAPPY! I made Chicken and Sausage Sandwiches with Fried Bell Peppers (uh, longest recipe title ever?).

Sausage, Chicken, Peppers & Onion Sandwich

Chicken and Sausage Sandwiches with Fried Bell Peppers
Courtesy Robin Miller

Ingredients
2 tablespoons olive oil, divided (skipped this and used the grease from frying the chorizo instead)
2 medium red bell peppers, seeded and sliced into thin strips
1 cup onion sliced into half-moons
Salt and freshly ground black pepper to taste
1 pound cooked shredded chicken
1 cup diced chorizo, andouille, or other cooked spicy sausage (I used chorizo)
2 tablespoons balsamic vinegar
4 long rolls (submarine or hoagie rolls)

Directions

I fried the chorizo first and then set it aside until it's added later

Heat 1 tablespoon of the oil in a large skillet over medium-high heat (again, just used the grease from the chorizo). Add the bell peppers and onion and cook, stirring, until softened, about 5 minutes. Season with salt and pepper. Remove the vegetables from the skillet and set aside.

Heat the remaining 1 tablespoon oil in the same skillet over medium-high heat. Add the chicken and cook until golden brown, 3 to 5 minutes. Add the sausage and vinegar and cook for 1 minute to heat through.

Using tongs, arrange the chicken mixture on the open rolls, top with the fried peppers and serve.

The Verdict: The title of Robin Miller's show is called Quick Fix and this was most certainly a quick fix. If I would've had cooked chicken on hand I would've had dinner done in 15 minutes so I was quite happen with that! The flavor of the balsamic really set this off from anything else similar that I've tried. We both really liked it but also thought the bread needs -something- before the meat goes onto it. It's a little dry otherwise. I also think that this would be good over rice or just by itself too!

Wednesday, April 14, 2010

Brie Stuffed Blackened Chicken

The Food Network Chefs Cooking Challenge has made it's way to Robert Irvine. His show, Dinner: Impossible, looks like it's probably interesting but since I'm not awesome and within the borders of the US, I can't even watch the streams on Food Network! Lame.

Brie Stuffed Blackened Chicken
Why yes that is the biggest chicken breast you've ever seen. We shared it because it was so massive!

Brie Stuffed Blackened Chicken
Courtesy Robert Irvine

Ingredients
  • 6 boneless, skinless chicken breasts
  • 3 ounces chilled Brie cheese, divided into 6 wedges, skin-on
  • 1 tablespoon paprika
  • 1 tablespoon cayenne pepper
  • 1/2 tablespoon ground cumin
  • 1/8 teaspoon garlic powder
  • 1/8 teaspoon onion powder
  • 1/2 tablespoon dried thyme
  • Pinch salt and freshly ground black pepper
  • 1/4 cup grapeseed oil
Directions

Preheat the oven to 350 degrees F.

Cut a 2 to 3-inch pocket in each chicken breast, and insert a wedge of Brie deep into each pocket and is covered with the top of the pocket.

In a large mixing bowl, add all the dried herbs and spices. Add the chicken and gently toss the in the mixture, coating evenly (keeping the cheese in the pocket). In a large skillet over high heat, add oil and sear the chicken on both sides until dark brown, but not burned, normally 3 to 4 minutes on each side. Put the skillet in the oven to bake until cooked through, about 6 to 8 minutes. Remove the chicken from the oven to a cutting board and let rest for 3 to 4 minutes.

The Verdict: I was able to make this recipe exactly as written which doesn't always happen so I was quite pleased! We both liked it a lot and I've added it to my recipe file. I have access to absurdly cheap French cheeses here, but I think mozarella or even blue cheese would be good if you can't get your hands on brie!

Wednesday, April 07, 2010

Honey Mustard BBQ Chicken & Butter Bean Salad

I don't really know why so many people hate Rachael Ray. She can be a little obnoxious but she does have some mighty tasty recipes. I was a bit curious to see if I could actually accomplish a "30 Minute Meal" since I'm a bit of a tortoise when it comes to things in the kitchen. Mission accomplished!

Honey Mustard BBQ Chicken

Honey Mustard and Red Onion Barbecued Chicken
Courtesy Rachael Ray

Ingredients:
  • 2 tablespoons vegetable oil
  • 1/2 red onion, chopped
  • 1/4 cup apple cider vinegar
  • 1/4 cup brown sugar, a couple of handfuls (A couple of handfuls? I would've ended up with like 3 times the recommended amount this way!)
  • 1 cup chicken stock
  • 1/2 cup prepared honey mustard (recommended: Honey Cup brand) (I did 1/4 cup mustard and 1/4 cup honey)
  • 1/2 teaspoon allspice, eyeball it
  • 1/2 teaspoon curry powder, eyeball it
  • 4 pieces boneless, skinless chicken breast
  • 4 boneless, skinless chicken thighs
  • Vegetable oil, for drizzling
  • Salt and freshly ground black pepper
Directions

Preheat grill pan or griddle over medium high heat (I cooked this in a skillet but I can see the merits of grilling it).

Pour 2 tablespoons vegetable oil into a small saucepan over moderate heat. Add red onions and saute 3 to 5 minutes. Add vinegar and reduce by half, 1 to 2 minutes. Add brown sugar and cook 1 minute to incorporate. Whisk in broth and honey mustard, allspice and curry. Bring sauce to a bubble and reduce heat to lowest setting.

Coat chicken with a drizzle of oil and salt and pepper, to your taste. Place chicken on hot grill (or skillet of awesomeness) and cook 4 or 5 minutes, then turn. Baste chicken liberally with sauce and cook another 5 minutes. Turn once again and baste. Cook 2 or 3 minutes more to cook through and transfer chicken to a platter and serve.

*****

Butter Bean Salad
Courtesy Rachael Ray

Ingredients:
  • 2 cans butter beans, rinsed and drained, 15 ounces each
  • 1/2 red bell pepper, diced (I used yellow because that's what I had!)
  • 1/2 green bell pepper, diced
  • 1/2 red onion, chopped
  • 2 cloves garlic, peeled and minced
  • 1 teaspoon ground cumin, 1/3 palm full
  • 2 tablespoons extra virgin olive oil
  • 1 large lemon, juiced
  • Coarse salt and freshly ground black pepper

Directions

Combine all ingredients in a medium bowl. Toss to coat beans and vegetables evenly in dressing.

*****

The Verdict: Four thumbs up! I liked that I didn't have to make a lot of crazy modifications to either of these recipes. The only thing I'd really change about the chicken is I'd possibly use less brown sugar or cut it out completely. The bean salad is easy and FAST and is even better the second day.

Wednesday, March 31, 2010

Avocado Chicken Salad

When you click on this weeks FNCCC chef and then select "low-calorie" or "low-fat" only 10 of over 1200 recipes pop up. Can you guess who it is? Paula Deen! I made her Banana Pudding last fall, so I decided to do a more savory dish this time. I made some alterations, so watch for my notes in italics.

Avocado Chicken Salad Sandwich

Avocado Chicken Salad
Courtesy Paula Deen

Ingredients
Salad:
3 cups cooked, diced chicken
3 cups cooked white rice
2 avocados, peeled, diced, and tossed with 1 tablespoon lemon juice
3/4 cup chopped onion (I used one very small onion)
1 cup mayonnaise (Since the dressing below also includes 1 cup of mayo, I completely left this out)
1 to 2 teaspoons pepper (I went for a few grinds of freshly ground)
1 teaspoon salt
1/4 cup chopped fresh parsley leaves
Thick, crusty bread, multi-grain or sourdough, for serving
Lemon wedges, for garnish (I'm just not that fancy so I didn't garnish mine with lemons!)

Avocado Dressing:

1 large avocado, peeled and mashed with 2 tablespoons lemon juice
1 cup mayonnaise (I used yogurt mayo and probably only did about 3/4 cup)
1/2 cup sour cream
1/2 teaspoon Worcestershire sauce
1/3 cup chopped onion
2 cloves garlic, minced
1 teaspoon salt
Dash cayenne pepper

Directions

Dressing:

Place all ingredients in a food processor and blend until smooth. Chill and serve alongside chicken salad. (I mixed this in with the salad itself instead of serving on the side)

Salad:
Mix all ingredients and chill. Pass with avocado dressing (again, I mixed the dressing into the salad because I ditched the mayo in the first group of ingredients). Serve on the crusty bread.

THE VERDICT: We both liked this. It's a bit different but not too bad! I think I'll use a bit of vinegar in the dressing next time because it was a little sweeter than I expected. I think that if I'd used regular mayo that wouldn't have been an issue though, so keep that in mind. It also could've been due to the fact that I forgot to salt the dressing and was just salting the salad afterwards.

Thursday, March 25, 2010

Layered Jello Fruit Salad

If you ask me what my favorite food is, I will tell you JELLO! There is just something about it's jiggly goodness. I amass a stockpile every time I go home since I can't get a sugar free version here. If you feel like donating some to the cause, I'll give you my address! Just kidding... sortof.

Layered Jello Salad

Layered Jello Salad

1 pkg Orange Jello
1 pkg Mixed Fruit Jello
2 cups vanilla yogurt (approx 1/2 a liter)
1 packet unflavored gelatin
500 grams strawberries
2 bananas
1 small can pineapple tidbits

Prepare the orange Jello according to the package directions, but use 1 3/4 cup water instead of two cups. This will make for a slightly firmer set. Pour into the bottom of your nice clear bowl and refrigerate for an hour or so. Carefully mix in the pineapple tidbits and let set until completely firm (2-3 hours).

Mix the unflavored gelatin in with the yogurt (follow the packet instructions for dissolving it first). You can skip this step, but it just makes it firm up better and if you're traveling with it it won't completely fall apart! Next, pour about a cup of the vanilla yogurt on top of the Jello. Slice the banana into coins and layer on top of the yogurt. Then pour the rest of the yogurt on top of the bananas and put it back in the fridge until the yogurt is set.

For the final layer, prepare the Jello as you did in the first step, using 1 3/4 cup water. Set aside and let cool (not in the fridge) while you hull and slice your strawberries. You will want your Jello cool, but not so cool it starts to gel. Layer the strawberries on top of the yogurt. Then spoon the Jello over the top of your berries. This is a little tricky because if you pour in too much it will ruin your yogurt layer (if you use the gelatin in the yogurt this won't be such an issue), so go slowly. Cover and refrigerate overnight before serving.

You can use whatever fruits and Jello flavor combinations you want. I think it would be fun to do a blue layer for a red white and blue salad.

*****
I'm participating in Mrs. Matlock's Alphabe-Thursday! Click the link below to see what other jolly jubilant joyful things people have posted about.

Jenny Matlock
Related Posts with Thumbnails