Showing posts with label Daring Cooks Challenge. Show all posts

Tuesday, June 14, 2011

Daring Cooks Challenge: Slimmed Down Potato Salad

Jami Sorrento was our June Daring Cooks hostess and she chose to challenge us to celebrate the humble spud by making a delicious and healthy potato salad. The Daring Cooks Potato Salad Challenge was sponsored by the nice people at the United States Potato Board, who awarded prizes to the top 3 most creative and healthy potato salads. A medium-size (5.3 ounce) potato has 110 calories, no fat, no cholesterol, no sodium and includes nearly half your daily value of vitamin C and has more potassium than a banana!

After browsing through some of the other freaking amazing recipes people came up with this time around I think my Daring Cooks recipe is rather undaring but it did taste good!

Slimmed Down Broccoli Potato Salad

1 kilo (2.2 lbs) small potatoes, quartered (use red or white or a combination of both)
1 head broccoli, cut into small florets
4 hard boiled eggs
1/2 cup greek yogurt (I used 0% Total)
1/4 cup mayo (if you use yogurt mayo you won't need to add any sweetener as it's rather much sweeter than normal mayo)
1 tbsp apple cider vinegar
2 tsp sugar or sweetener of your choice
1 tsp ground mustard
1/2 tsp horseradish powder
1/2 tsp salt
freshly ground pepper, to taste
1 small red onion, diced
1 small sweet onion, diced
3 celery ribs, chopped
1 large red bell pepper, diced
1 large yellow bell pepper, diced

Place the potatoes in a pan and cover with salted water. Bring to a boil. Reduce heat and simmer for about 12 minutes. Drain and cool for a half an hour or so.

Chop up the hard boiled eggs. You can leave out the yolks if you want to slim the recipe down a little more but I like to add them in.

In a large bowl whisk together the yogurt, mayo, vinegar, sugar, mustard, and salt. Add the potatoes, eggs, and veggies and toss to coat.

Chill in the fridge for about a couple of hours and serve cool.

Sunday, February 14, 2010

Daring Cooks Challenge: Mezze Table

The 2010 February Daring Cooks challenge was hosted by Michele of Veggie Num Nums. Michele chose to challenge everyone to make mezze based on various recipes from Claudia Roden, Jeffrey Alford and Naomi Dugid.

The challenge is to prepare a Mezze (pronounced “mez-ay", although many people seem to pronounce it as "mezz”) Table including, but not limited to, homemade Pita bread and Hummus. If you’re not familiar with mezze, it’s more of a style of eating than a specific recipe or recipes. Mezze is a bunch of small dishes served all at once—sort of like the Middle Eastern version of Spanish Tapas. It can be served as appetizers before a meal, or as the meal itself.

Homemade Pitas

Pita Bread – Recipe adapted from Flatbreads & Flavors by Jeffrey Alford and Naomi Duguid

Prep time: 20 minutes to make, 90 minutes to rise and about 45 minutes to cook

Ingredients:

2 teaspoons regular dry yeast
2.5 cups lukewarm water
5-6 cups all-purpose flour (may use a 50-50 combo of AP & whole wheat)
1 tablespoon salt
2 tablespoons olive oil

Directions:
  1. In a large bread bowl, sprinkle the yeast over the warm water. Stir to dissolve. Stir in 3 cups flour, a cup at a time, and then stir 100 times, about 1 minute, in the same direction to activate the gluten. Let this sponge rest for at least 10 minutes, or as long as 2 hours.
  2. Sprinkle the salt over the sponge and stir in the olive oil. Mix well. Add more flour, a cup at a time, until the dough is too stiff to stir. Turn it out onto a lightly floured surface and knead for 8 to 10 minutes, until smooth and elastic. Rinse out the bowl, dry, and lightly oil. Return the dough to the bowl and cover with plastic wrap. Let rise until at least doubled in size, approximately 1 1/2 hours.
  3. Place a pizza stone, or two small baking sheets, on the bottom rack of your oven, leaving a 1-inch gap all around between the stone or sheets and the oven walls to allow heat to circulate. Preheat the oven to 450F (230C).
  4. Gently punch down the dough. Divide the dough in half, and then set half aside, covered, while you work with the rest. Divide the other half into 8 equal pieces and flatten each piece with lightly floured hands. Roll out each piece to a circle 8 to 9 inches in diameter and less than 1/4 inch thick. Keep the rolled-out breads covered until ready to bake, but do not stack.
  5. Place 2 breads, or more if your oven is large enough, on the stone or baking sheets, and bake for 2 to 3 minutes, or until each bread has gone into a full balloon. If for some reason your bread doesn't puff up, don't worry it should still taste delicious. Wrap the baked breads together in a large kitchen towel to keep them warm and soft while you bake the remaining rolled-out breads. Then repeat with the rest of the dough.

I had to get a little creative with how to bake these for a couple of reasons. My oven only goes up to 225 and it doesn't hold the temperature as well as one might hope. Secondly, it's a combi unit and only has one shelf, so the bottom rack is really in the middle of the oven. Finally, I don't have a baking stone. I was determined to make it work though and got a lot of good advice from Audax and cuppy. I put a pan of water in the bottom to help keep the temperature, and I kept it on the "preheat" setting the whole time they were baking (which keeps the broiler/grill on).

Next I did the goodies to serve with the pitas.

Mezze

Hummus – Recipe adapted from The New Book of Middle Eastern Food by Claudia Roden

Prep Time: Hummus can be made in about 15 minutes once the beans are cooked. If you’re using dried beans you need to soak them overnight and then cook them the next day which takes about 90 minutes.

Ingredients:

1 1/2 cups dried chickpeas, soaked in cold water overnight (or use 1 10 ounce can)
2 lemons, juiced
2-3 garlic cloves, peeled and crushed
big pinch of salt
4 tablespoons tahini (sesame paste) OR use peanut butter or any other nut butter

Directions:
  1. Drain and boil the soaked chickpeas in fresh water for about 1 ½ hours, or until tender. Drain, but reserve the cooking liquid.
  2. Puree the beans in a food processor (or you can use a potato masher) adding the cooking water as needed until you have a smooth paste.
  3. Add the rest of the ingredients and mix well. Adjust the seasonings to taste.

Roasted Pepper and Walnut Dip from veggienumnums.com

Ingredients:

4 large bell peppers
1 cup finely chopped walnuts
4 cloves garlic
salt
juice of 1/2 to 1 lemon
1 tablespoon extra virgin olive oil
pinch of chili pepper

Roast the peppers by turning them under the broiler or in the hottest oven until their skins blacken and blister, then skin them and remove the seeds. Blend the peppers to a paste in the food processor, add the rest of the ingredients, and blend very briefly.

Tzatziki
Ingredients:

1 cup thick Greek yogurt
2-3 cloves garlic, minced.
1/2 cup seeded and minced (or grated) cucumber
1/4 tsp salt

Mix ingredients and let sit for a few hours in the fridge. Add salt to taste.

Baked Falafel
(Click the link to see the recipe.)

*****

This was a fun challenge. I was really worried about the pitas but they actually worked out really well! I used the 50/50 combo of ap flour and whole wheat flour. They were nice and fluffy and even though they didn't puff up as impressively as I've seen some they DID puff enough. The recipe is huuuuuge though, so I think I'll halve it next time.

I used peanut butter in the hummus (I know, I know, it's not authentic that way). I've made it with tahini in the past and I guess I just don't like sesame paste. The pepper and walnut dip was really nice too! The tzatziki and falafel recipes were my own and complimented the other goodies quite well.

I think my favorite part of The Daring Kitchen is the recipes are things I probably wouldn't try otherwise. I HAVE tried to make pitas before but they were hockey pucks of awful horror and went in the trash. I couldn't salvage them. This gave me the opportunity to try again and to troubleshoot some of the issues that I think I had the last time.

Thanks for the challenge Michele!

Thursday, January 14, 2010

Daring Cooks Challenge: Pork Sate

The January 2010 Daring Cooks challenge was hosted by Cuppy of Cuppylicious and she chose a delicious Thai-inspired recipe for Pork Satay from the book 1000 Recipes by Martha Day.

We could choose our own meat/tofu , but the required part of this challenge was marinate. Marinades serve two purposes, to: 1) add awesome flavor and 2) tenderize tougher meats.

Pork Sate

Pork Sate with Peanut Sauce

Marinade:
1/2 small onion
2 garlic cloves
1 tbsp ginger root (optional)
2 tbsp lemon juice
1 tbsp soy sauce
1 tsp ground coriander (I realized I was out of this and crushed the heck out of some coriander seeds with my mortar and pestle instead)
1 tsp ground cumin
1/2 tsp ground tumeric
2 tbsp oil (vegetable, peanut, olive)

Stuff to be marinated:
1 lb pork (loin or shoulder cuts)

Cheater alert: If you have a food processor just toss everything except the pork in and blend until smooth.

Chop the onion, garlic and ginger root very finely. Mix it into the rest of the marinade ingredients.

Cut Pork into 1 inch strips.

Cover pork with marinade. You can place the pork into a bowl, cover/seal and chill or place the whole lot into a ziplock bag and chill.

Let the pork marinade for 4-8 hours (no more than 24).

If you use bamboo skewers make sure to soak them in warm water for at least 20 minutes before using.

Gently slide strips of meat onto skewers. Discard leftover marinade.

Broil or grill at 290 C/550 F (or pan fry on medium high) for 8-10 minutes (until the edges start to char), turn and cook another 8-10 minutes.

Sate

Peanut Sauce

3/4 cup coconut milk
4 tbsp peanut butter (I used about twice this amount, it just seemed too runny otherwise)
1 tbsp lemon juice
1 tbsp soy sauce
1 tsp brown sugar
1/2 tsp ground cumin
1/2 tsp ground coriander (again, I used the mortar and pestle to crush the seeds)
1-2 dried red chilies (keep the seeds for heat), chopped (I used crushed dried chilies since that's what I had)

Mix dry ingredients in a small bowl. Add soy sauce and lemon, mix well.

Over low heat, combine coconut milk, peanut butter and your soy-lemon seasoning mix. Mix well, and stir often. The aim is to heat and melt the peanut butter, but don't let it boil!

This was a little different than the "Dutch" sate you find here, but we both quite liked it! The sauce was really good but I might play around with the marinade a little more next time I make it. Thanks cuppy!

Monday, December 14, 2009

Daring Cooks Challenge: Salmon en Croute

I failed at getting November's Daring Cooks Challenge of sushi done, so I vowed to get this month's done and I was quite glad I did.

The December 2009 Daring Cooks challenge was hosted by Simone of Junglefrog Cooking. Simone chose Salmon en Croute (or alternative recipes for Beef Wellington or Vegetable en Croute) from Good Food Online.

Salmon en Croute

Equipment required:
For the Salmon en croute
oven
food processor
rolling pin

Salmon en croute:
Ingredients
Mascarpone or cream cheese 5.2 ounces/150 gr
Watercress, rocket (arugula) and spinach - 0.6 cup/4.2 ounces/120 gr
Shortcrust pastry (recipe below) - 17.6 ounces, 500 gr.Salmon fillet (skinless)- 17.6 ounce/500 gr
egg - 1 medium sized

Directions:
1.Heat the oven to 200°C/390 F. Put the mascarpone or cream cheese in a food processor with the watercress, spinach and rocket and whizz the lot until you have a creamy green puree. Season well.
2. Roll the pastry out so you can wrap the salmon in it completely (approx. 2-3 mm thick) and lay it on a buttered or oiled baking sheet (it will hang over the edges). Put the salmon in the middle. If it has a thinner tail end, tuck it under. Spoon half of the watercress mixture onto the salmon. Now fold the pastry over into a neat parcel (the join will be at the top, so trim the edge neatly), making sure you don’t have any thick lumps of pastry as these won’t cook through properly. Trim off any excess as you need to. Make 3 neat cuts in the pastry to allow steam to escape and make some decorations with the off-cuts to disguise the join if you like. Brush with the egg glaze.
3. Bake for 30 minutes or until the pastry is crisp and browned. To test wether the salmon is cooked, push a sharp knife through one of the cuts into the flesh, wait for 3 seconds then test it against the inside of your wrist; if it is hot, the salmon is cooked. Serve with the rest of the watercress puree as a sauce.

Shortcrust pastry*:
While this is not mandatory to do, I highly recommend making your own shortcrust pastry as it is very simple to do! As mentioned in the notes; please make sure to not add too much water as that is the key to having a successful shortcrust pastry.

Ingredients:
450 gr (15.8 ounces or 3.2 cups ) of plain all purpose flour
200 gr ( 7 ounce) cold butter
pinch of salt

Sift the flour into a large bowl, add the butter and rub in with your fingertips until the mixture resembles fine breadcrumbs. If you have a food processor you can use that as shown in the above video.
Stir in the salt, then add 2-3 tbsp of water and mix to a firm dough. Knead the dough briefly and gently on a floured surface. Wrap in cling film and chill while preparing the filling.

For best results make sure the butter is very cold.

*I used frozen puff pastry because it was more simple and allowed me to actually get this challenge done!

The Verdict: This was really very good and suprisingly simple. I'll certainly make it again! I couldn't get my hands on watercress so I used another from the garden cress in hopes that would impart a similar flavor. I also squeezed a bit of lemon juice into the cheese mixture. I think 30 minutes was probably plenty of time for the salmon to finish cooking and I'll probably take it out at 25 minutes next time.

Wednesday, October 14, 2009

Daring Cooks Challenge: Pho Ga (Vietnamese Chicken Noodle Soup)

The Daring Cooks challenge for October was hosted by Jaden of The Steamy Kitchen. She challenged us with a recipe from her new cookbook for Quick Vietnamese Chicken Pho. We also had the option of using the long version of the recipe from her blog which entailed making your own stock instead of using canned. That's what I ended up doing, but I'll post the "quickie" version here.

Pho

Ingredients:

For the Chicken Pho Broth:
2 tbsp. whole coriander seeds
4 whole cloves
2 whole star anise
2 quarts (2 liters/8 cups/64 fluid ounces) store-bought or homemade chicken stock
1 whole chicken breast (bone in or boneless)
½ onion
1 3-inch (7.5 cm) chunk of ginger, sliced and smashed with side of knife
1 to 2 tbsps. sugar
1 to 2 tbsps. fish sauce

1 lb. (500 grams/16 ounces) dried rice noodles (about ¼ inch/6 mm wide)

Accompaniments:

2 cups (200 grams/7 ounces) bean sprouts, washed and tails pinched off
Fresh cilantro (coriander) tops (leaves and tender stems)
½ cup (50 grams/approx. 2 ounces) shaved red onions
½ lime, cut into 4 wedges
Sriracha chili sauce
Hoisin sauce
Sliced fresh chili peppers of your choice

Directions:

1. To make the Chicken Pho Broth: heat a frying pan over medium heat. Add the coriander seeds, cloves and star anise and toast until fragrant, about 3-4 minutes. Immediately spoon out the spices to avoid burning.
2. In a large pot, add all the ingredients (including the toasted spices) and bring to a boil.
3. Reduce the heat to medium-low and let simmer for 20 minutes, skimming the surface frequently.
4. Use tongs to remove the chicken breasts and shred the meat with your fingers, discarding the bone if you have used bone-in breasts.
5. Taste the broth and add more fish sauce or sugar, if needed. Strain the broth and discard the solids.
6. Prepare the noodles as per directions on the package.
7. Ladle the broth into bowls. Then divide the shredded chicken breast and the soft noodles evenly into each bowl.
8. Have the accompaniments spread out on the table. Each person can customize their own bowl with these ingredients.

I made my own stock and honestly I'm not sure it was worth the effort I put into it. I've made chicken stock before but doing it the way suggested here left me with a rather bland tasting stock... which I found strange considering all of the various spices and such involved. We added some salt when we served it and that helped but when I first tasted it I thought "WAAAAAHHHH! All that time and energy wasted!" Maybe if I'd let it simmer longer... or used less water... I'm not really sure what happened. Once we added in the goodies at the end it worked out but I don't think I'd eat this soup without the additions. My other observation is that fish sauce smells unpleasant. I'm glad it didn't taste like it smelled. I think this is a recipe worth trying, but like I said I'd probably make stock my normal way instead of this way and then add the spices like in the quickie version.

As a nice little twist, we also had an add-on challenge for making Dessert Won Tons. We could decide what we wanted inside the won tons as long as it was sweet. I went nuts with marshmallows, peanut butter, and bananas. Marshmallows do crazy things when put under intense heat. It's pretty amazing. I only made a few of these because they were fried and my arteries are probably cross with me for all the frying on challenge recipes I've been doing lately. They were good though!

Sweet Wontons

Eet smakelijk!

Monday, September 14, 2009

Daring Cooks Challenge: Vegan Indian Dosas

This month's Daring Cooks Challenge was hosted by Debyi from The Healthy Vegan Kitchen. She chose a vegan version of Indian Dosas.

Dosas are essentially Indian crepes. Traditionally, they're made with rice and black lentils, but the recipe we used called for spelt flour instead. The challenge was also to make your dish vegan.

The requirements: Must be free of animal products, this will be a challenge for you “regular” cooks out there, but its worth it. So that means, no cows milk, butter, meat, poultry, fish, chicken/beef broth, etc. This dish is also 99% oil free, using only what you need to keep the dosas from sticking (I used a quick spritz of cooking spray on the first dosa only), which isn't too bad with a nonstick pan. You can use a different filling/sauce if you like, but it must be free of animal products.
This recipe comes in 3 parts, the dosas, the filling and the sauce. It looks like a lot of ingredients, but many are used multiple times over the three parts.

Daring Cooks September Challenge

Curried Garbanzo Filling

5 cloves garlic
1 onion, peeled and finely diced
1 carrot, peeled and finely diced
1 green pepper, finely diced (red, yellow or orange are fine too)
2 medium hot banana chilies, minced
2 TBSP (16gm) cumin, ground
1 TBSP (8gm) oregano
1 TBSP (8gm) sea salt (coarse)
1 TBSP (8gm) turmeric
4 cups (850gm/30oz) cooked or canned chick peas (about 2 cans)
½ cup (125gm/4oz) tomato paste

1.Heat a large saucepan over medium to low heat. Add the garlic, veggies, and spices, cooking until soft, stirring occasionally.
2.Mash the chickpeas by hand, or in a food processor. Add the chickpeas and tomato paste to the saucepan, stirring until heated through.

The Verdict: The filling was very good. I used only a fraction of the salt since I used canned beans, but even if you soak your I think you'd only want a tablespoon if the size of your rock salt mimicked sugar cubes.

Coconut Curry Sauce

1 onion, peeled and chopped
2 cloves garlic
½ (2½ gm) tsp cumin, ground
¾ (3¾ gm) tsp sea salt (coarse)
3 TBSP (30gm) curry powder
3 TBSP (30gm) spelt flour (or all-purpose GF flour)
3 cups (750ml/24oz) vegetable broth
2 cups (500ml/24oz) coconut milk
3 large tomatoes, diced

1.Heat a saucepan over medium heat, add the onion and garlic, cooking for 5 minutes, or until soft.
2.Add the spices, cooking for 1 minutes more. Add the flour and cook for 1 additional minute.
3.Gradually stir in the vegetable broth to prevent lumps. Once the flour has been incorporated, add the coconut milk and tomatoes, stirring occasionally.
4.Let it simmer for half an hour.

The Verdict: This recipe is HUGE. I'm going to have enough leftover sauce to put on rice for the next seven weeks. The sauce can be frozen, though the texture might be a little different when it's thawed. It should still taste good though! We both really liked this.

Dosa Pancakes
1 cup (120gm/8oz) spelt flour (or all-purpose, gluten free flour)
½ tsp (2½ gm) salt
½ tsp (2½ gm) baking powder
½ tsp (2½ gm) curry powder
½ cup (125ml/4oz) almond milk (or soy, or rice, etc.)
¾ cup (175ml/6oz) water
cooking spray, if needed

1.Combine the dry ingredients in a bowl, slowly adding the almond milk and water, whisking until smooth.
2.Heat a nonstick skillet over medium heat. Spray your pan with a thin layer of cooking spray, if needed.
3.Ladle 2 tablespoons of batter into the center of your pan in a circular motion until it is a thin, round pancake. When bubbles appear on the surface and it no longer looks wet, flip it over and cook for a few seconds. Remove from heat and repeat with remaining batter. Makes 8 pancakes.

The Verdict: I don't know where exactly I went wrong, but my dosas were more like don'tsas. Firstly, I think the spelt flour I found wasn't the same as what you might find in the US. It was a bit coarser and that led to a very lumpy thick batter. I ladled 2 tablespoons of batter and had a TEENY dosa, so I poured a bit more in and that didn't work out too well.

Disasterous Dosa!

After that debacle, I decided to thin out the batter with a little more soy milk and water. That worked a little bit better, but I still don't know how two tablespoons of batter like the recipe calls for was making the nice big dosas that other people making the recipe were coming up with. They ended up tasting just alright, but I think if I do try to make them again I'm either going to try the traditional way of making them or use regular flour. Make sure your pan is HOT, not just medium warm too.


Dosa Toppings
1 batch Coconut Curry Sauce (see below), heated
¼ cup (125gm) grated coconut
¼ cucumber, sliced

Fill the dosas with the filling. Ladle a bit of sauce over the dosas, and sprinkle with coconut. Garnish with cucumber, and serve with rice if you like.

The Entire Verdict: I'd try this again, but I'd use a different recipe for the dosas. I would probably suggest halving the sauce and filling unless you want leftovers. Since my dosas were so tiny, I didn't fill them with the filling. Instead I served it over rice and had the dosas on the side.

Daring Cooks September Challenge

Friday, August 14, 2009

Daring Cooks Challenge: Rice with mushrooms, seafood and artichokes

A few months ago, I came across The Daring Kitchen website. It was started by two ladies who decided to challenge themselves to make pretzels using the very same recipe. They liked it so much they went onto another challenge the next month, and thus the Daring Bakers were born. After awhile it looked like the cooks were feeling left out, so there's also a Daring Cooks challenge for those of us who are baking challenged!

Each month someone hosts the challenge by picking a recipe and posting it in the super secret forums of the Daring Kitchen website. This was my first attempt.

This month's challenge was hosted by Olga from Olga's Recipes (English) and las casas de olga (Spanish). She chose a Spanish recipe: Rice with mushrooms, cuttlefish, and artichokes by Jose Andres. You can see how he makes the dish on this YouTube video.

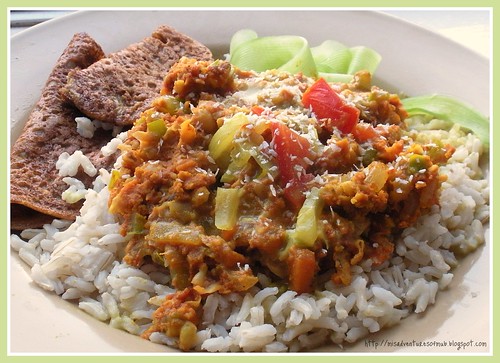
While I was reading through the recipe I started getting nervous. For starters, I didn't even know what a cuttlefish was! I looked it up and decided it was going to be rather hard to come by so I started looking for alternatives. Olga mentioned using squid, shrimp, chicken, or vegetables instead. I couldn't make myself be daring enough to get a fresh squid and had settled on shrimp when I found a frozen zeevruchten mix that consisted of mussels, shrimps, octopus, clams, and surimi. I also decided to toss some chorizo in to give it a little extra zing.

You can see the original recipe on Olga's blog. I'll share my version with you here! We'll start with the sofregit and allioli recipes first.

Sofregit

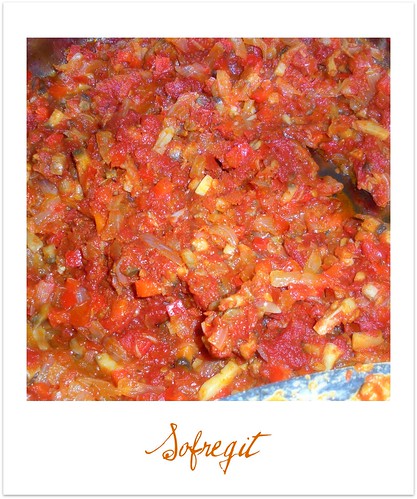
Sofregit is a well cooked and fragrant sauce made with olive oil, tomatoes, garlic, and onions and oftentimes has other vegetables such as bell peppers and mushrooms.
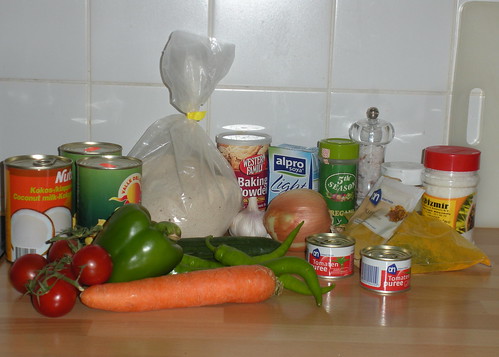
You will need:
2 tbsp olive oil
5 big red ripe tomatoes, chopped
2 small onions, chopped
1 bell pepper, chopped (I used red)
4 or 5 garlic cloves, chooped
1 cup mushrooms, chopped
1 small can (70 g) tomato paste*
1 bay leaf
salt to taste
sprinkle of cumin
sprinkle of oregano

Put all ingredients together into a high sided frying pan and saute slowly until all vegetables are soft. Salt to taste. I let this simmer about an hour and a half just so everything could blend and be fabulous.

*Tomato paste is optional. I only had 3 really good tomatoes and the rest were a little meh, so I added the tomato paste to give it a little more flavor.

This makes a lot more than you'll need for the rice recipe, but it's fantastic sauce and should freeze well to use for pasta and other dishes later on.

**********

Allioli

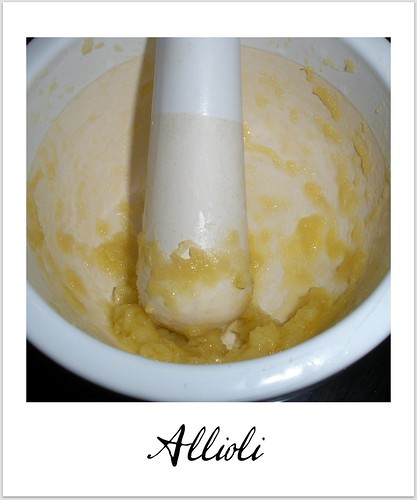
Allioli is a sauce made from garlic and olive oil. The traditional method involves making a paste from the garlic with a mortar and pestle and slowly adding oil until you get a nice thick paste. This was what I did, but I didn't yield much and think I should've added quite a lot more oil.

You will need:

4 garlic cloves, peeled
Pinch of salt
Few drops of lemon juice
Olive oil

Place the garlic in a mortar along with the salt.

Using a pestle, smash the garlic cloves to a smooth paste. (The salt stops the garlic from slipping at the bottom of the mortar as you pound it down.)

Add the lemon juice to the garlic.

Drop by drop; pour the olive oil into the mortar slowly as you continue to crush the paste with your pestle.

Keep turning your pestle in a slow, continuous circular motion in the mortar. The drip needs to be slow and steady. Make sure the paste soaks up the olive oil as you go.

Keep adding the oil, drop by drop, until you have the consistency of a very thick mayonnaise. If your allioli gets too dense, add water to thin it out.

This takes time—around 20 minutes of slow motion around the mortar—to create a dense, rich sauce.

A little of this goes a long way, but it really really compliments the flavors of the rice.
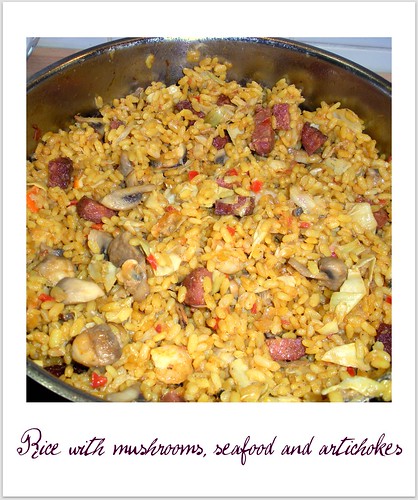
**********

Rice with mushrooms, seafood, and artichokes

You will need:

Glug or two of olive oil
1 can artichoke hearts, cut into eighths
12 mushrooms, cut into quarters
2 bay leaves
125 ml white wine
150 g 
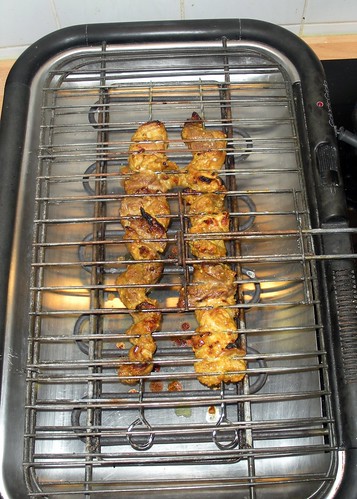
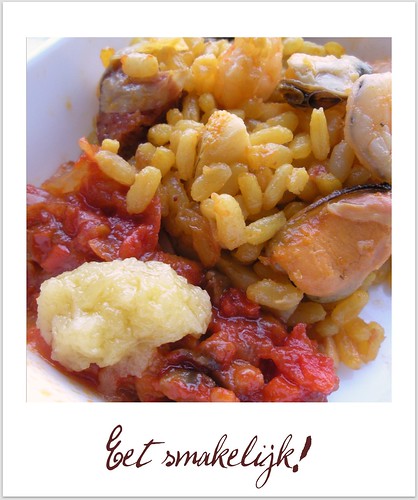
zeevruchten mix (seafood mix- cooked)
75 g chopped and fried Spanish chorizo
Sofregit- see recipe below
1 cup Arborio rice
3 cups fish stock (I used fish bullion and water)
Pinch saffron powder (turmeric can also be used)
Allioli- see recipe below

Directions:

Heat a glug or two of olive oil in your pan.

When warm, add the artichokes, mushrooms and bay leaf.

Saute until the artichokes are a golden color, about 5-7 minutes.

Add the wine and mix.

Add 3 or 4 tablespoons sofregit and mix well.

Pour in the fish stock and bring to a boil.

Add the rice and boil under a high heat for 5 minutes.

Add the saffron, seafood and chorizo and stir slightly.

Turn down the heat and boil for another 8 minutes. Remove pan from heat and let sit for a couple of minutes before serving with the allioli.

Daring Kitchen August Challenge
Related Posts with Thumbnails